Are you the proud owner of a new AirTag and wondering how to connect AirTag? Look no further!
Connecting your AirTag is a simple and straightforward process that can be done in just a few easy steps.
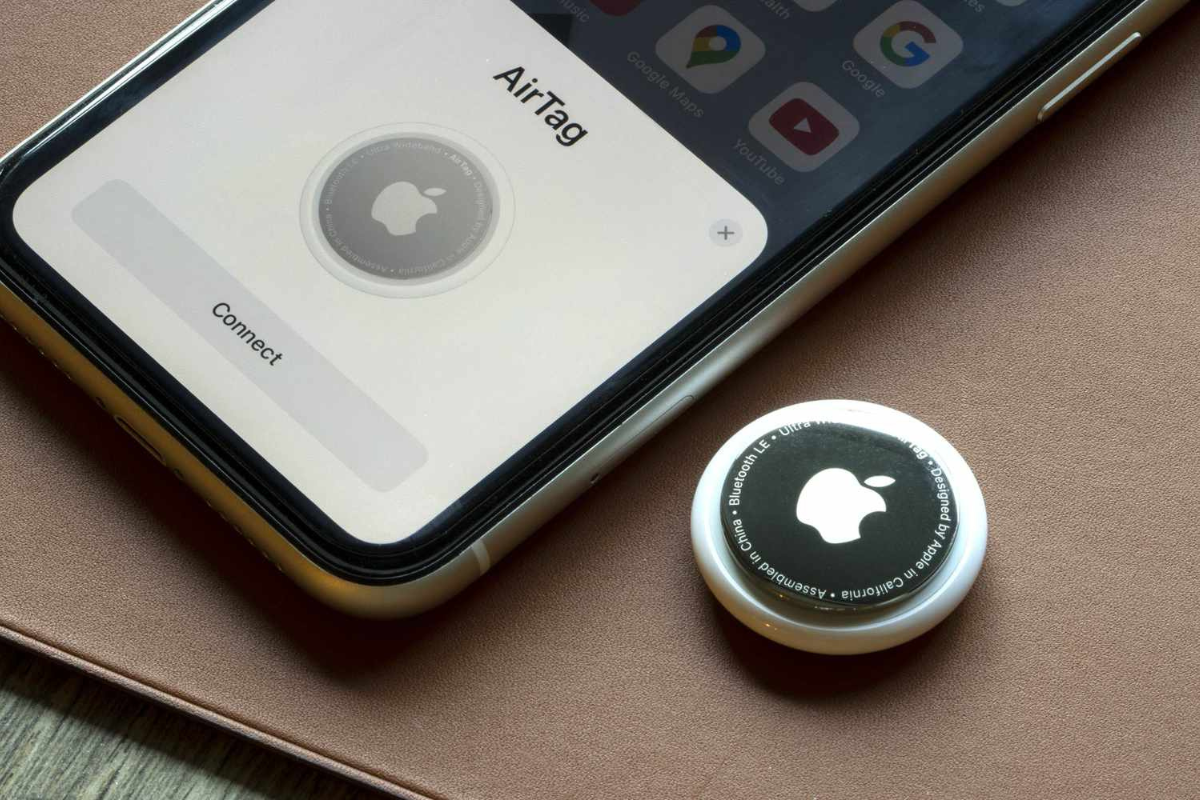
First, make sure your AirTag is near your device and turned on.
Then, hold your AirTag near your iPhone, iPad, or iPod touch and tap Connect.
If you have multiple AirTags, ensure that only one is near your device at a time.
If you need help connecting your AirTag, you can select an item name from the list or choose a custom name and emoji.
By following these simple steps, you can easily connect your AirTag to your Apple device and start tracking your items using Find My.
With the help of ultra-wideband technology and Apple’s existing network of devices, AirTags are a reliable and efficient way to keep track of your belongings.
Keep reading to learn more about how to set up and use your AirTag.
What Is An AirTag?
If you’re someone who frequently misplaces your belongings, an AirTag can be a lifesaver.
An AirTag is a small, puck-shaped device that can track your lost items using Bluetooth technology.
It’s an affordable and easy-to-use solution for keeping track of your everyday items like keys, backpacks, and wallets.
AirTags are designed and sold by Apple, and they work in conjunction with the Find My app on your iPhone, iPad, or iPod touch.
You can attach an AirTag to any item you want to keep track of, and then use the Find My app to locate it if it goes missing.
One of the best things about AirTags is that they’re incredibly easy to set up and use.
You can connect them to your Apple devices in just a few simple steps, and once you’ve done that, you can start using them to keep track of your belongings right away.
Overall, AirTags are a great option for anyone who wants a simple, reliable way to keep track of their belongings.
They’re affordable, easy to use, and they work seamlessly with your Apple devices.
So if you’re someone who frequently misplaces your keys or other items, consider investing in an AirTag to help you keep track of them.
Connecting AirTag To Your iPhone Or iPad
If you have purchased an AirTag and want to connect it to your iPhone or iPad, you can follow these simple steps to get started.
Using Find My App
- First, make sure your iPhone or iPad is running on iOS 14.5 or iPadOS 14.5 or later.
- Open the Find My app on your device.
- Tap on the “Items” tab at the bottom of the screen.
- Tap on the “Add Item” button.
- Hold your AirTag close to your device and wait for the AirTag to appear on the screen.
- Tap on the “Connect” button next to the AirTag.
- Follow the on-screen instructions to complete the setup process.
Setting Up AirTag Notifications
Once you have connected your AirTag to your device, you can set up notifications to receive alerts when your AirTag is separated from your device or moves to a different location.
- Open the Find My app on your device.
- Tap on the “Items” tab at the bottom of the screen.
- Tap on the AirTag you want to set up notifications for.
- Tap on the “Notify When Found” option.
- Choose whether you want to receive notifications when the AirTag is found by anyone or only by people in your Family Sharing group.
- Tap on the “Add” button to confirm your selection.
You can also customize the name of your AirTag, enable Lost Mode to track your AirTag if it gets lost, and reset your AirTag if you need to start over.
Remember, AirTag uses Bluetooth and the Find My network to communicate with your device.
If your AirTag is out of Bluetooth range, it can use the Find My network to update its location.
However, unwanted tracking is a concern, so make sure to use AirTag responsibly and always respect others’ privacy.
Connecting your AirTag to your iPhone or iPad is a simple process that can be completed in just a few steps.
With the help of AirTag, you can keep track of your important items and never lose them again.
Using AirTag To Find Your Lost Items
If you’re prone to misplacing your keys, wallet, or other important items, AirTag can be a lifesaver.
Here’s how to use AirTag to find your lost items.
Precision Finding
One of the best features of AirTag is Precision Finding, which helps you locate your lost item with pinpoint accuracy. To use Precision Finding:
- Open the Find My app on your iPhone or iPad.
- Tap on the AirTag you want to locate.
- Tap on the “Play Sound” button.
- Walk around the area until you hear the sound getting louder.
- Use the on-screen arrow and distance indicator to guide you to your lost item.
Precision Finding is especially useful when your lost item is hidden under a pile of clothes or in a crowded room.
Playing A Sound On Your AirTag
Sometimes, you might not need the pinpoint accuracy of Precision Finding.
In those cases, you can use the Play Sound feature to help locate your lost item.

- Open the Find My app on your iPhone or iPad.
- Tap on the AirTag you want to locate.
- Tap on the “Play Sound” button.
- Follow the sound until you find your lost item.
If your AirTag is within Bluetooth range, you should hear the sound immediately.
If your AirTag is out of range, you can use the Find My network to help locate it.
To use the Find My network:
- Open the Find My app on your iPhone or iPad.
- Tap on the AirTag you want to locate.
- Tap on the “Notify When Found” button.
- If your AirTag is located by another iPhone, you’ll receive a notification with its location.
Keep in mind that the Find My network relies on other people’s devices to locate your lost item.
So, it may take some time to locate your AirTag if it’s out of range.
In conclusion, AirTag is a great tool for finding your lost items.
With Precision Finding and Play Sound features, you can locate your lost items with ease.
Just make sure to turn on Location Services and keep your AirTag within Bluetooth range to get the most accurate location information.
AirTag Battery Life And Replacement
When you purchase an AirTag, it comes with a pre-installed battery that is expected to last for about a year before it needs to be replaced.
However, the actual battery life may vary depending on usage and environmental factors.
To check the battery life of your AirTag, you can use the Find My app on your iPhone, iPad, or iPod touch.
Here’s how to check the battery life of your AirTag:
- Open the Find My app on your iPhone, iPad, or iPod touch.
- Tap the “Items” tab.
- Select the AirTag whose battery life you want to check.
- If the battery life is low, you will see a “Low Battery” notification under the name of your AirTag.
When your AirTag’s battery life is running low, it’s time to replace the battery.
The AirTag uses a standard CR2032 battery, which is commonly available in most stores.
Here’s how to replace the battery of your AirTag:
- Press down on the polished stainless steel battery cover of your AirTag.
- Rotate the cover counterclockwise until it stops rotating.
- Remove the cover and the battery.
- Replace the battery with a new CR2032 battery.
- Press down on the battery until you hear a sound. This sound means that the battery is connected.
It’s important to note that the AirTag is not rechargeable, so you will need to replace the battery when it runs out.
Apple recommends using only genuine Apple batteries for your AirTag to ensure optimal performance and safety.
In summary, the battery life of your AirTag can be checked using the Find My app, and the battery can be replaced with a new CR2032 battery when it runs out.
Always use genuine Apple batteries for your AirTag to ensure optimal performance and safety.
Privacy Concerns With AirTag
AirTag is a useful tool for keeping track of your belongings, but it has also raised some privacy concerns.
One of the major concerns is the potential for AirTag to be used by men to stalk or track women without their consent.

To address this concern, Apple has implemented several privacy features.
For example, when setting up an AirTag, users are now required to enable “Precise Location” and receive a warning that using AirTag to track people without their consent is a crime in many regions around the world.
Apple has also implemented an alert system that will notify you if an AirTag that doesn’t belong to you is near you for an extended period of time.
This feature is designed to prevent someone from using an AirTag to track your location without your knowledge.
If you are concerned about someone using an AirTag to track you, you can also check for any nearby AirTags using your iPhone.
Simply open the Find My app and look for any AirTags that are not yours.
If you find an AirTag that doesn’t belong to you, you can disable it by holding down the button on the AirTag until it beeps.
Overall, while there are some privacy concerns with AirTag, Apple has taken steps to address them and make the product safer to use.
By enabling Precise Location, being aware of your surroundings, and checking for nearby AirTags, you can help protect your privacy and ensure that AirTag is used for its intended purpose of tracking your belongings.
Alternatives To AirTag
If you’re looking for an alternative to Apple’s AirTag, there are a few options available on the market.
One of the most popular alternatives is Tile.
Tile
Tile is a Bluetooth tracker that has been around for a while and offers several different models to choose from.
The one we recommend for most people is the Tile Mate.
It has a range of up to 200 feet and can be attached to keys, wallets, and other items you don’t want to lose.
One of the advantages of Tile over AirTag is that it works with both Android and iOS devices.
You can use the Tile app to track your items, and if you lose your phone, you can use your Tile to find it.
Tile also has a feature called “Community Find,” which allows other Tile users to help you locate your lost item.
If someone with the Tile app on their phone walks by your lost item, you’ll receive a notification with its location.
Another advantage of Tile is that it offers a wider range of accessories than AirTag.
You can get Tile stickers, Tile Slims, and even a Tile Pro with a replaceable battery.
Conclusion
While AirTag is a great option for iPhone users, Tile is a fantastic alternative for anyone using an Android or iOS device.
With its long range, community find feature, and range of accessories, Tile is a reliable and affordable way to keep track of your belongings.
Conclusion
Congratulations! You have successfully connected your AirTag to your iPhone or iPad.
With this new device, you can now keep track of your everyday items like keys, backpacks, or luggage when you’re traveling.
Remember to always keep two-factor authentication turned on to ensure the security of your device.
This will prevent unauthorized access to your AirTag and the items it is attached to.
It is also important to note that AirTags are small and can be a choking hazard, so be sure to keep them out of reach of small children and pets.
Finally, always make sure that your iPhone or iPad is updated with the latest version of iOS to ensure that you have all the latest features and fixes for any bugs that may affect connectivity.
Enjoy the convenience and peace of mind that your new AirTag brings!